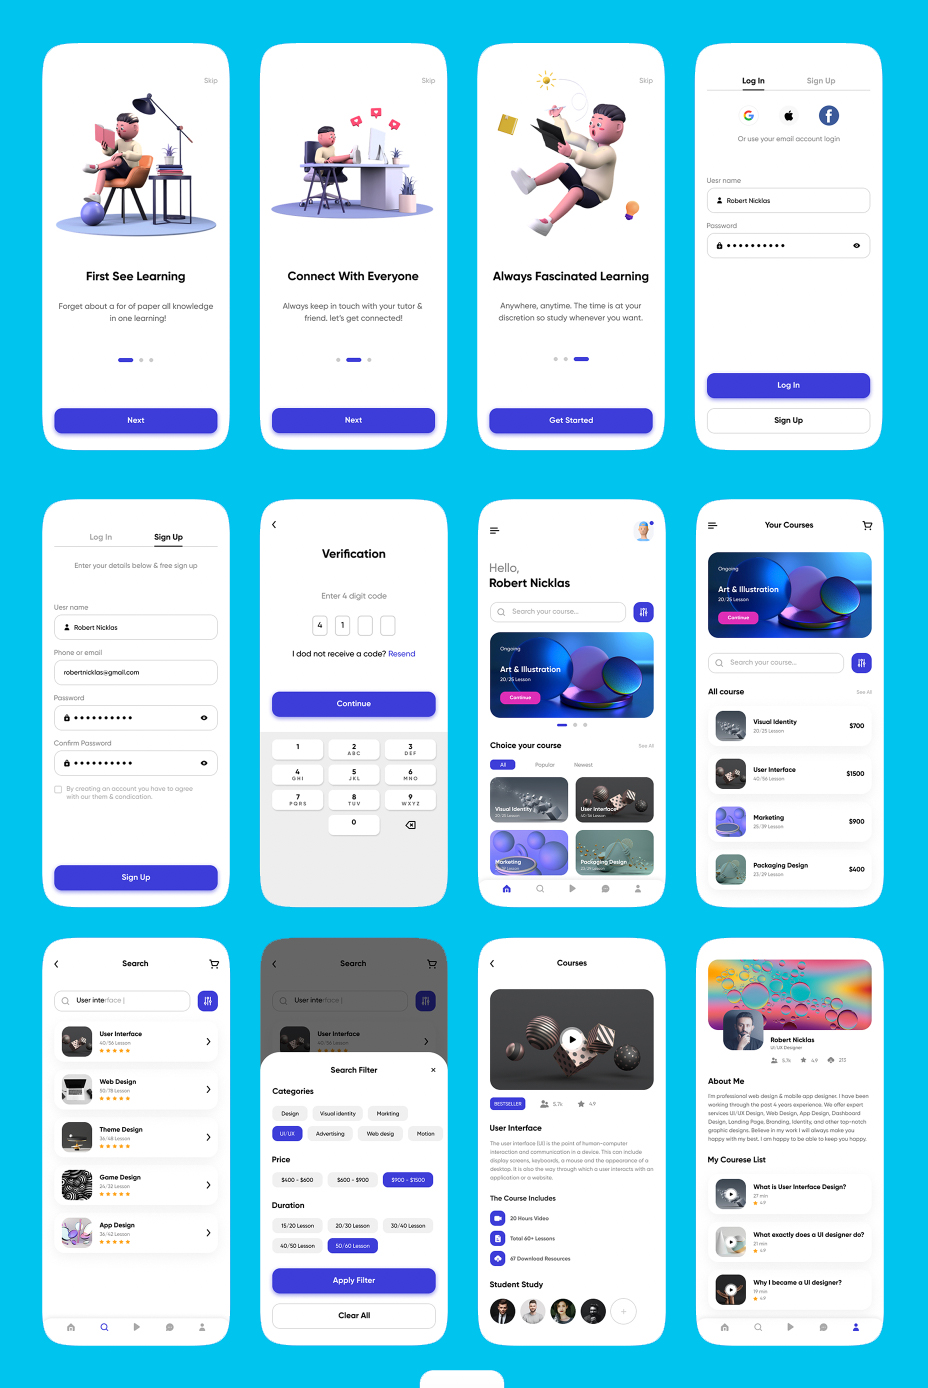
This is an online learning course app tutorial using BLoC state management. In this course, we focus how to build a Flutter app for selling course with Stripe payment and Laravel as backend with Restful API. This course also covers teacher's app. So you will be building two apps. State management and routing both have been done using BLoC.
It also contains extra chatting app for teachers.
It consists of Laravel backend with Firebase for basic social media login. Most of the API are built using Laravel. The backend contains multi admin( super admin panel and teachers panel) including teacher's app for chatting. On Udemy it has two parts and students have to take both course to complete it.
Both parts have to be bought separately.
Take the BLoC Course on Udemy Part 1
Take the BLoC Course on Udemy Part 2

Get the source code. The below source code includes admin panel, teacher's panel and teacher chat app.
App Features
State Management
We used BLoC to manage state and as well for routing. If you follow the video tutorial you learn about BLoC events, states, abstract class, constructor, on() method, emit() function, trigger events, adding events, BlocObserver, different way of writting on events, why we need abstract class, how to create states, different classes, how to do debugging and networking using BLoC and Cubit.
This tutorial on Udemy course has partly used Cubit for state management apart from BLoC.
Backend
We used Laravel framework for building backend and API. Backend has multi user previliges. It means there are super admins and sub admins. Teachers accounts are sub admin. Super admin can observe and assign roles to the teachers or the sub admins.
With this course, you will learn how to build token for your api and how to do authorization of user access using Sanctum package of Laravel.
We used Laravel eloquent to work with our database from controller.
By the end of this course, you will master
Payment
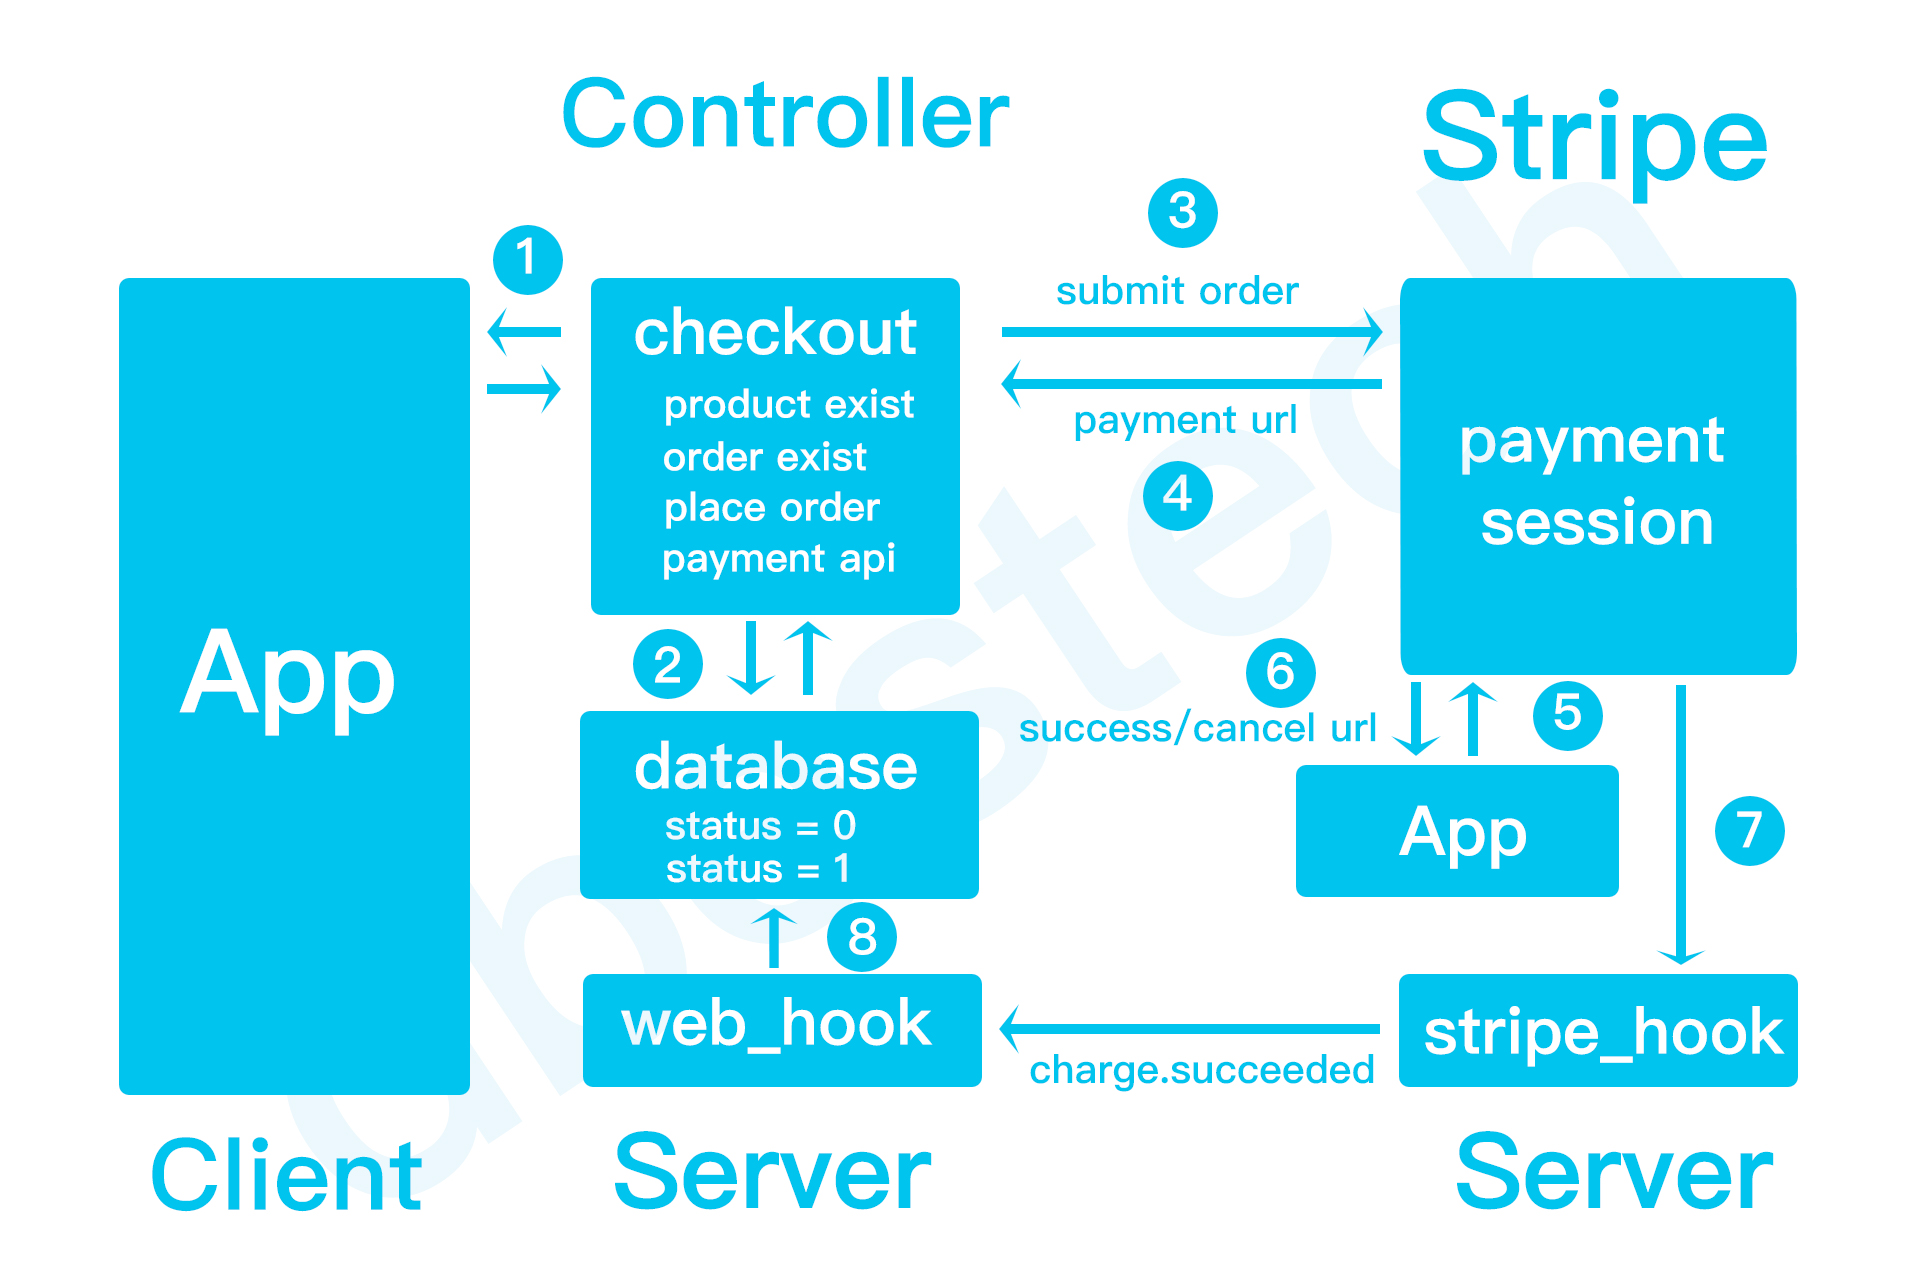
This course put a dedicated session to talk about building payment api using Stripe. We also explained in detail using picture to make it understand how payment works.

To get the watermark free picture, you may take the course or buy the picture of psd version for one dollar only on buymeacoffe.
Firebase
Firebase is used for email login and third party login like Google, Facebook and Apple. We also used Firebase for storing chat information of users. All the chat messages are also saved in Firebase.
Version
Deployment guide backend
1. Download the code from buymecoffee
2. First make sure you have xampp server installed. If not click on the link install it.
3. Make sure you drag and drop laravel backend inside htdocs.
4. Make sure you have create a new database and upload the mysql database from the downloaded folder
5. After that you need to update your .env file according to your database name and your user name and password
6. Then do the following commands
7. If you are running locally make sure you set ADMIN_HTTPS=false
8. With the above command you should be able to run server from localhost. In general you would be able to access it using http://127.0.0.1:8000
9. You would be able to access the admin panel by http://127.0.0.1:8000/admin username: admin, password: admin or 123456
Frontend deployment
1. First do flutter clean and flutter pub get
2. Then make sure you change the package name of your app
3. Then you need to do flutter firebase configuration in the terminal
4. Make sure you have keytool installed to generate SHA1 and SHA256 keys
5. Then generate SHA1 & SHA256 key for the app
6. Make sure you put the SHA1 and SHA256 keys in the firebase console
7. Make sure you redownload the google-service.json file in your android/app/ folder
8. You need to enable Google/Email login from Firebase Athentication
9. Then you need to put your local host address in constants.dart file
SERVER_API_URL for this variable
10. In general for iOS localhost address default one is fine which is 127.0.0.1. For android it's 10.0.2.2, and make sure you have put the port number correctly. It's 8000 in general.
Teacher's panel
Here I will show to separate teacher's panel from super amdin panel. Once we seperate the panel then user would be able to upload courses on the backend.
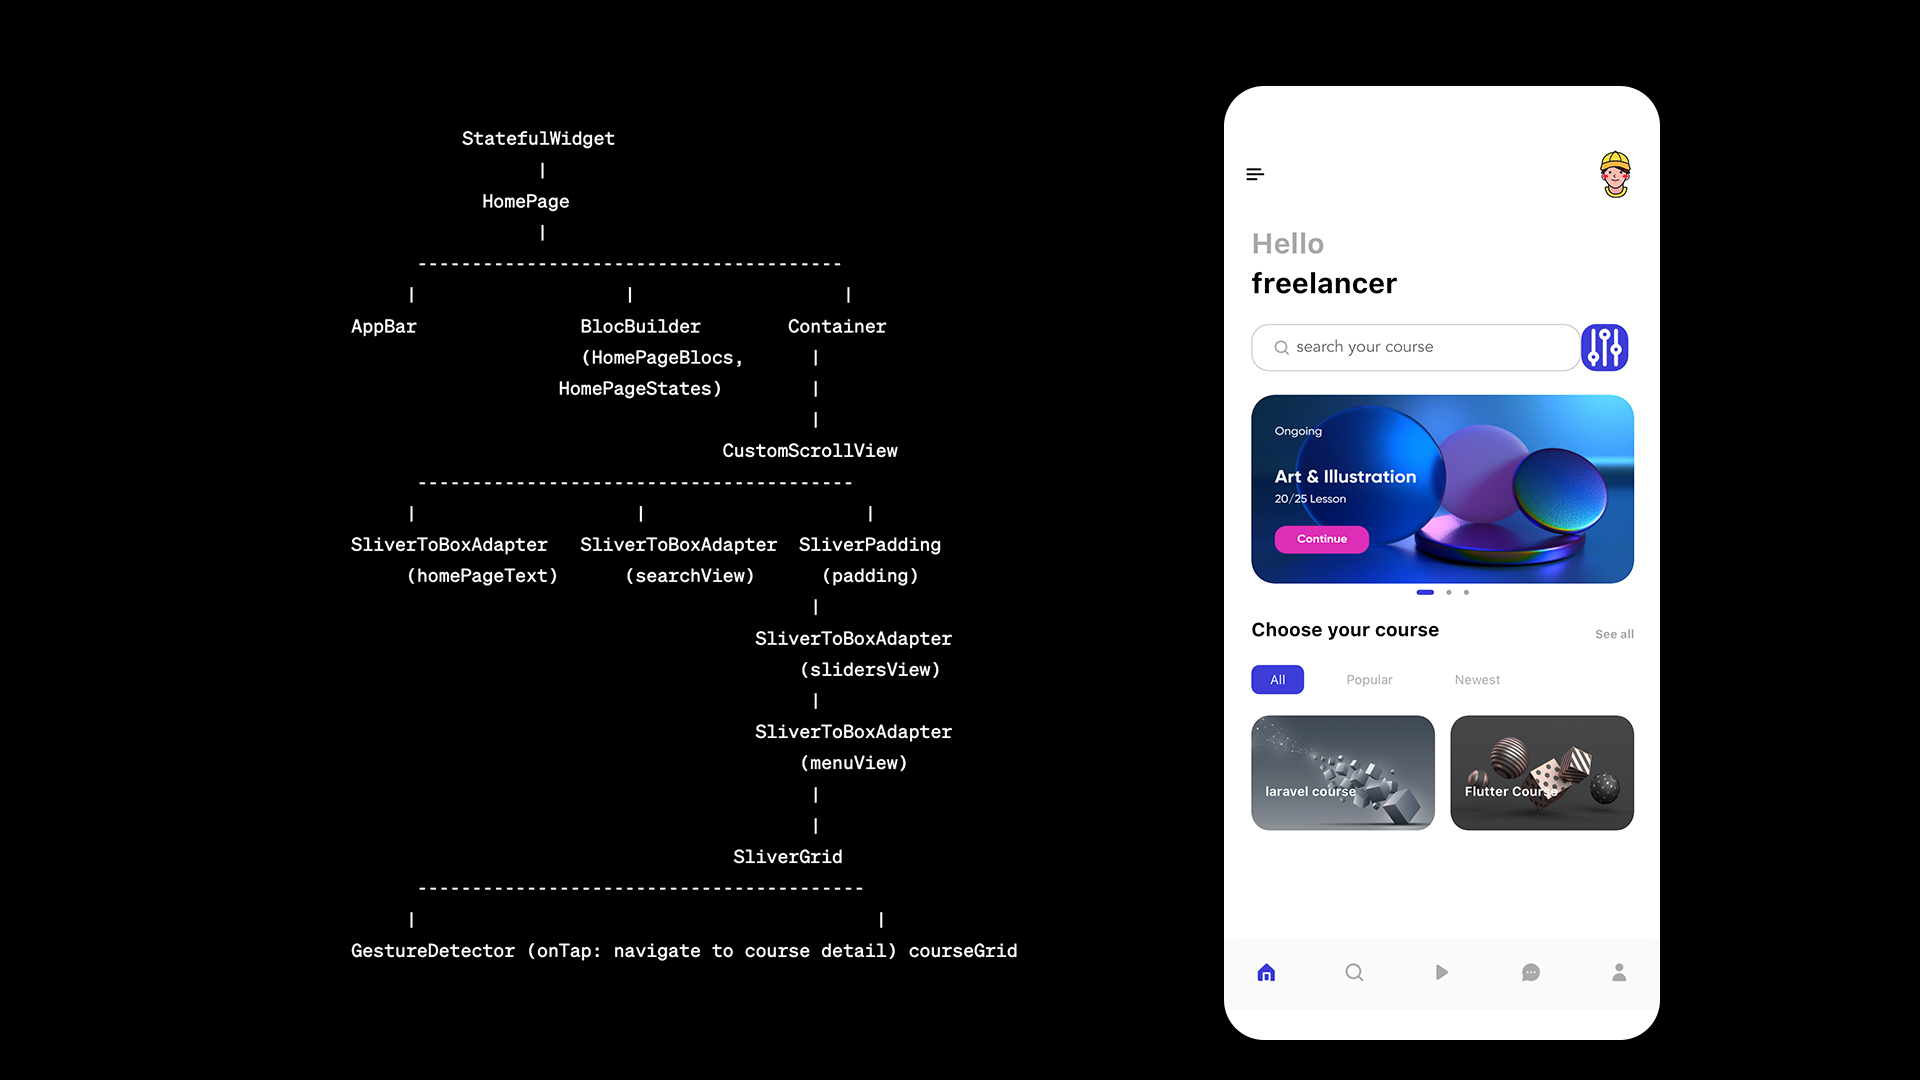
Home Page and Code
Here in the picture you may get the idea how our home page is build. Clear idea of different components and how they are organized. This is a basic flow of the widget.

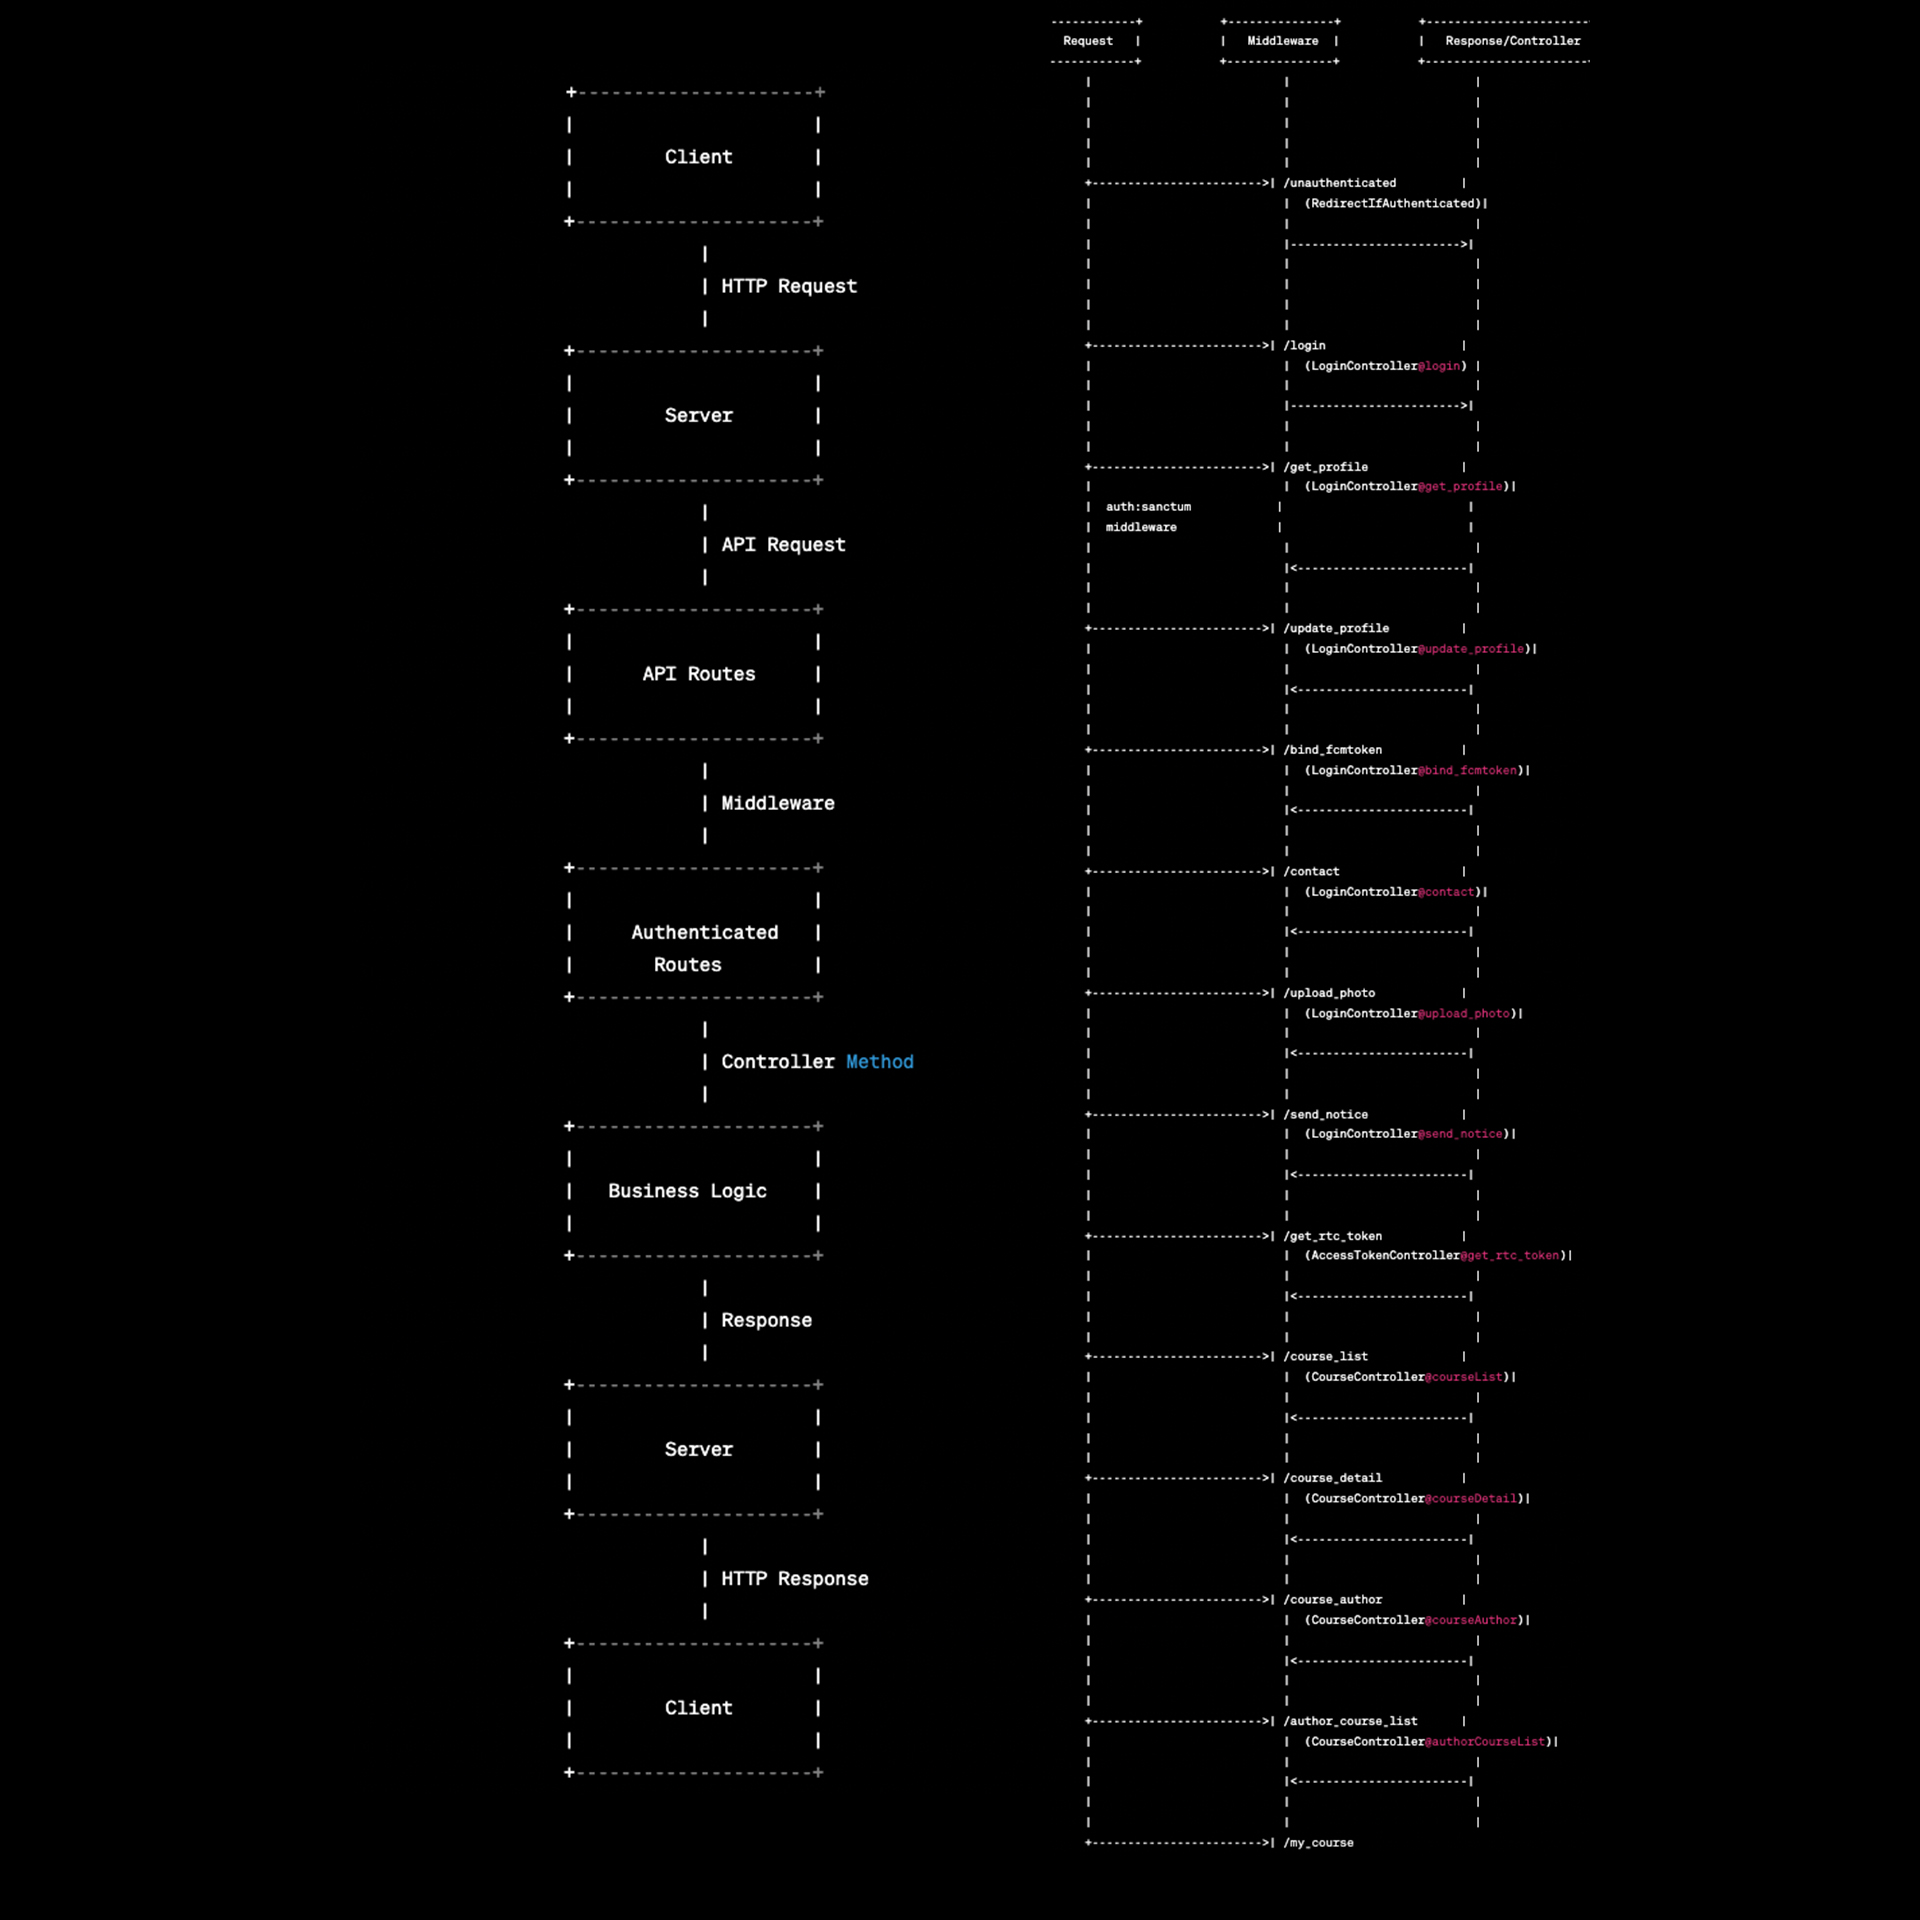
Server Side diagram of the API
Here, you get the complete picture how our request and response works in terms of authentication with sanctum. You also see the steps how each steps occurs in terms of client and server.

Issues to Fix
SingleChildWidget
You may get SingleChildWidget error. To get rid off this issue, just comment out Entity class and you are good to go.
On Udemy lecture 78 has shown it.
_pageController issue
Here you need to declare _pageController at the top, then your _pageController not found.
Resources to follow the app
1. Download from the top right corner
2. Color file
The color file. Create a file name colors.dart inside lib/common/values/ folder and save it. If you don't have folder values, then create one
import 'dart:ui';

class AppColors {

  /// white background
  static const Color primaryBackground = Color.fromARGB(255, 255, 255, 255);
  /// grey background
  static const Color primarySecondaryBackground = Color.fromARGB(255, 247, 247, 249);
  /// main widget color blue
  static const Color primaryElement = Color.fromARGB(255, 61, 61, 216);
  /// main text color black
  static const Color primaryText = Color.fromARGB(255, 0, 0, 0);
  // video background color
  static const Color primary_bg = Color.fromARGB(210, 32, 47, 62);
  /// main widget text color white
  static const Color primaryElementText = Color.fromARGB(255, 255, 255, 255);
  // main widget text color grey
  static const Color primarySecondaryElementText = Color.fromARGB(255, 102, 102, 102);
  // main widget third color grey
  static const Color primaryThreeElementText = Color.fromARGB(255, 170, 170, 170);

  static const Color primaryFourElementText = Color.fromARGB(255, 204, 204, 204);
  //state color
  static const Color primaryElementStatus = Color.fromARGB(255, 88, 174, 127);

  static const Color primaryElementBg = Color.fromARGB(255, 238, 121, 99);


}

Some upgradea
1. composer require encore/laravel-admin:1.* --with-all-dependencies
2024-12-19 12:13:02
I won’t succeed to do it alone. I wish it could work like Udemy because that way is useless for teachers. They won’t get money from their efforts. I wonder why is stripe their for?!
2024-12-19 09:57:38
I didn’t understand. Can is there a video showing this process. Because I want it working like Udemy payment process: Pay to enroll/to access the class.
There's no video about it. You can return alll the course from the backend in an api. Then then first check if the user is logged in or not. If the user is not logged don't let the user to to buy. Just say you are not logged in. If the user is logged in, then once the user clicks to see the course, check if they have a buying record or not.
2024-12-18 16:13:33
Dear Ahmed, Could you please tell me if it’s normal to users access the lessons before buy them? It happens that users after login access the lesson for free. I want them to pay the class before them access to it. It’s about Flutter Riverpod.
You can check them first and let the user click on it. So you can return data from database first and return buying status as well and save it in the front end and once the user click on a course you may check the buying status
2024-12-18 16:13:07
Dear Ahmed, Could you please tell me if it’s normal to users access the lessons before buy them? It happens that users after login access the lesson for free. I want them to pay the class before them access to it. It’s about Flutter Riverpod.
2024-10-01 20:02:37
great learning platform
Like and share
 starter file
 Get the apk(user)
 Get the apk(teacher)