We will learn how to upload image from local storage or albums to app for Flutter. And then how to upload the image to the database mysql server using restful api using both Laravel and NodeJS.
We will show it both for Laravel and Nodejs server using restful api.
For this purpose we will use a plugin called image_picker.
Go head and run
flutter add image_picker
flutter pub get
This will install the latest image_picker plugin. Unfortunately this plugin doesn't work well Mac M1 chip.
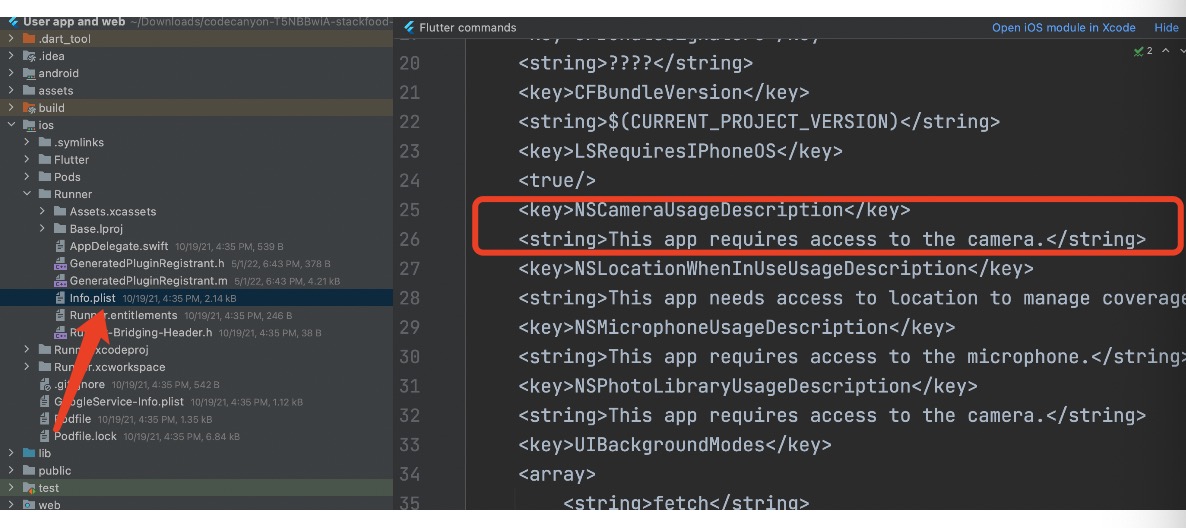
This plugin doesn't need any special set up for Android but it requires special settings in iOS info.plist

So put the code in info.plist
<key>NSCameraUsageDescription</key>
<string>This app requires access to the camera.</string>
See the complete code below
void main() {
  runApp(const MyApp());
}

class MyApp extends StatelessWidget {
  const MyApp({Key? key}) : super(key: key);

  @override
  Widget build(BuildContext context) {
    Get.lazyPut(()=>ImageController());
    return const MaterialApp(
      // Hide the debug banner
      debugShowCheckedModeBanner: false,
      title: 'Image upload',
      home: HomePage(),
    );
  }
}

class HomePage extends StatefulWidget {
  const HomePage({Key? key}) : super(key: key);

  @override
  _HomePageState createState() => _HomePageState();
}

class _HomePageState extends State<HomePage> {
  File? _image;
  PickedFile? _pickedFile;
  final _picker = ImagePicker();
  // Implementing the image picker
  Future<void> _pickImage() async {
   _pickedFile=
    await _picker.getImage(source: ImageSource.gallery);
    if (_pickedFile != null) {
      setState(() {
        _image = File(_pickedFile!.path);
      });
    }
  }

  @override
  Widget build(BuildContext context) {
    return Scaffold(
        appBar: AppBar(
          title: const Text('Image upload'),
        ),
        body: SafeArea(
          child: Padding(
            padding: const EdgeInsets.all(35),
            child: Column(children: [
              Center(
                child: GestureDetector(
                  child: const Text('Select An Image'),
                  //onPressed: _openImagePicker,
                  //onTap:()=> Get.find<ImageController>().pickImage(),
                  onTap: ()=>_pickImage(),
                ),
              ),
              const SizedBox(height: 35),
               Container(
                  alignment: Alignment.center,
                  width: double.infinity,
                  height: 200,
                  color: Colors.grey[300],
                  child: _pickedFile != null
                      ? Image.file(
                    File(_pickedFile!
                        .path), width: 100, height: 100, fit: BoxFit.cover,
                  )
                      : const Text('Please select an image'),
                )
            ]),
          ),
        ));
  }
}
Server upload
We need two things for image upload to the server.
1. image controller
2. restful api code
Image Controller
First we will create a new dart file name image_controller.dart and put the below variables. This image controller depends on Getx. This tutorial assumes you you know getx.
class ImageController extends GetxController{
 PickedFile? _pickedFile;
 PickedFile? get pickedFile=>pickedFile;

}
If you want to upload the image to the server. You need to create a button. On the button press, call the below method upload() in the image_controller.dart
  Future<void> upload() async {

    http.StreamedResponse response = await updateImage(_pickedFile);
    _isLoading = false;
    if (response.statusCode == 200) {
      Map map = jsonDecode(await response.stream.bytesToString());
      String message = map["message"];
      _imagePath=message;
     // _pickedFile = null;
      //await getUserInfo();
      print(message);
    } else {
      print("error posting the image");
    }
    update();

  }
Now we need to work on updateImage() method. Let's define it like below
  Future<http.StreamedResponse> updateProfile(PickedFile? data) async {
    http.MultipartRequest request = http.MultipartRequest('POST', Uri.parse('http://127.0.0.1:8000/upload'));
   // request.headers.addAll(<String,String>{'Authorization': 'Bearer $token'});
    if(GetPlatform.isMobile && data != null) {
      File _file = File(data.path);
      request.files.add(http.MultipartFile('image', _file.readAsBytes().asStream(), _file.lengthSync(), filename: _file.path.split('/').last));
    }
    Map<String, String> _fields = Map();
    _fields.addAll(<String, String>{
      'f_name': userInfoModel.fName,  'email': userInfoModel.email
    });
    request.fields.addAll(_fields);
    http.StreamedResponse response = await request.send();
    return response;
  }
The above should send a token from your device to the server for authentication. But for the simplicity of this dummy app, we will just send the image.
For sending the image we are using http.MultipartRequest.
It's a post request which takes your base url for the server, and end point. See here we mention the endpoint.
You should use your own end point. This api, saves the image path to the mysql database server.
Restful Api
Laravel upload
        public function upload(Request $request){
         $dir="test/";
         $image = $request->file('image');

        if ($request->has('image')) {
                $imageName = \Carbon\Carbon::now()->toDateString() . "-" . uniqid() . "." . "png";
                if (!Storage::disk('public')->exists($dir)) {
                    Storage::disk('public')->makeDirectory($dir);
                }
                Storage::disk('public')->put($dir.$imageName, file_get_contents($image));
        }else{
             return response()->json(['message' => trans('/storage/test/'.'def.png')], 200);
        }

        $userDetails = [

            'image' => $imageName,

        ];

       // User::where(['id' => 27])->update($userDetails);

        return response()->json(['message' => trans('/storage/test/'.$imageName)], 200);
    }
This restful api end point should be pointed from your flutter app. Here I am using laravel
Nodejs server upload
We used express, multer and body-parser to build a simple nodejs server. Create a nodejs app and a file name app.js and put the below code in the app.js
const express = require('express');
const bodyParser = require('body-parser');
const app = express();
const multer = require('multer');

/*------------------------------------------
--------------------------------------------
parse application/json
--------------------------------------------
--------------------------------------------*/
app.use(bodyParser.json());

/*------------------------------------------
--------------------------------------------
image upload code using multer
--------------------------------------------
--------------------------------------------*/
var storage = multer.diskStorage({
   destination: function (req, file, cb) {
      cb(null, 'test');
   },
   filename: function (req, file, cb) {
      cb(null, Date.now() + '-' + file.originalname);
   }
});
var upload = multer({ storage: storage });
app.use(express.static(__dirname+'public/'));
app.use('/test', express.static('test'));

/**
 * Create New Item
 *
 * @return response()
 */
app.post('/upload', upload.single('image'),(req, res) => {

    res.send(apiResponse({message:  req.file.path}));
});

/**
 * API Response
 *
 * @return response()
 */
function apiResponse(results){
    return JSON.stringify({"status": 200, "error": null, "message": results["message"]});
}

/*------------------------------------------
--------------------------------------------
Server listening
--------------------------------------------
--------------------------------------------*/
app.listen(3000,() =>{
  console.log('Server started on port 3000...');
});
The above code will store image in the test folder inside app folder.
Update ui using Getx
              GetBuilder<ImageController>(builder:(_) {
                return Container(
                  alignment: Alignment.center,
                  width: double.infinity,
                  height: 200,
                  color: Colors.grey[300],
                  child: Get
                      .find<ImageController>()
                      .pickedFile != null
                      ? Image.file(
                    File(Get
                        .find<ImageController>()
                        .pickedFile!
                        .path), width: 100, height: 100, fit: BoxFit.cover,
                  )
                      : const Text('Please select an image'),
                );
              }
              ),
              const SizedBox(height: 35),
              Center(
                child: GestureDetector(
                  child: const Text('Server upload'),
                  //onPressed: _openImagePicker,
                  onTap:()=> Get.find<ImageController>().updateUserInfo(),
                ),
              ),
              const SizedBox(height: 35),
              GetBuilder<ImageController>(builder:(_) {
                return Container(
                  alignment: Alignment.center,
                  width: double.infinity,
                  height: 180,
                  color: Colors.grey[300],
                  child: Get
                      .find<ImageController>()
                      .imagePath != null
                      ? Image.network(
                    "http://mvs.bslmeiyu.com"+Get
                        .find<ImageController>()
                        .imagePath!,
                     width: 100, height: 100, fit: BoxFit.cover,
                  )
                      : const Text('No image from server'),
                );
              }
              ),